Site Tools
User Tools
This is an old revision of the document!
Table of Contents
User Interface Overview
The ToolMap user interface integrates the following elements:
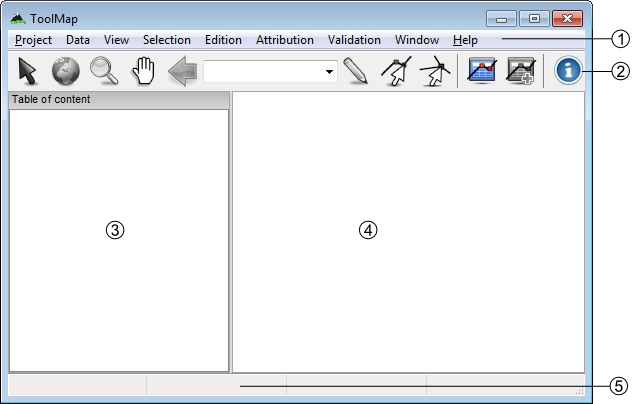
- Menu bar
- Toolbar
- Table of content
- Visualization and editing window
- Status bar
Menu bar
In the menu bar nine menus are available, each of them will lead you to different options:
- Project: This menu contains all options related to the project management.
- Data: This menu allows the user to add or import support data into the project.
- View: The view menu contains all options for navigating and zooming into the displayed data.
- Selection: This menu contains tools for managing the selection.
- Edition: All tools related to the editing process are located into this menu.
- Attribution: This menu contains the tools used when attributing datas.
- Validation: This menu contains the tools used to check the objects and layers before exportation as well as the Statistics… tool.
- Window: windows management.
- Help: The Help Menu provides various help functions as well as options for reporting a bug.
Toolbar
The toolbar is accessible on top of the application window, right under the menu bar. It allows to quickly access to the different main tools available in ToolMap. Most of the toolbar buttons are grayed out while no project is open.
Selection tool
 Select one or several geometrical objects
Navigation tools
 Zoom to the maximum extent of all visible layers
 Zoom in or out into the visualization window
 Pan the view in any direction
 Go back to the previous zoom extent
Edition tool
 Draw a new object
 Modify an existing object
 Modify shared node
Attribution tools
 Display the Object kind panel
 Display the Object attribute window
Information tool
 Display the identification window
Scale
 Drop-down menu of available scales. User defined scale can be set using the Project → Edit → Settings menu
Table of Content
The table of content shows a list of all the layers loaded in the project. It looks like the following:
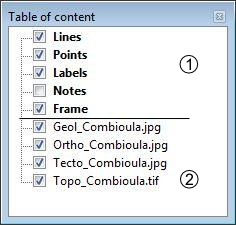
- Construction layers, they are automatically generated at the creation of the project and can be edited. They are displayed using a bold font.
- Support Themes, they cannot be edited.
Status bar
The status bar at the bottom of the application window provides additional informations like geographical coordinates or the number of features selected.
Layouts
You can access Toolmap's different layouts using the Layout option of the Window menu. These allow you to use three different kinds of windows disposition :
- The Default layout, which is the one you get when first launching Toolmap. This is the one displayed in the User Interface Overview above.
- The Vertical layout, which includes all the useful windows in a vertical display.
- The Horizontal layout, which includes the same windows than the Vertical layout but do so in the left border and the bottom of the display window.
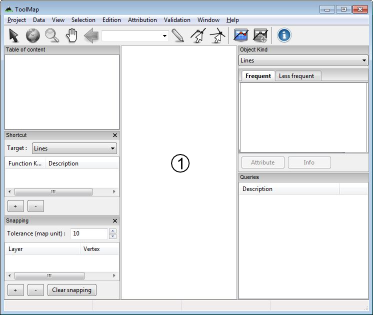

You can freely close any of the tab you wish using the corresponding menu or reorganise your tabs by clicking and droping them where you want them to be. ToolMap will then remember your new custom layout and display it when you launch it.
You can switch back to one of the three base layouts anytime by simply selecting them again in the Window menu.
keyboard shortcuts
Keyboard Shortcuts have been set to the most used functions to make the use of Toolmap easier/quicker.
Project management
- Ctrl+N: Create a new empty project
- Ctrl+Alt+N: Create a new project based on a template
- Ctrl+Alt+O: Open an existing project
- Ctrl+S: Backup the project
- Ctrl+Alt+S: Save the project as a template
- Ctrl+Alt+E: Open the export layer window
- Ctrl+O: Link data
- Ctrl+W: Unlink data
Navigation tools
- Z: Zoom tool
- H: Pan tool
- <: Previous zoom
- Ctrl+0: Zoom to the full extent
- Ctrl+R: Refresh display
Editor tools
- V: Selection tool
- Ctrl+D: Clear Selection
- Ctrl+Z: Remove the last vertex
- D: Draw a feature
- M: Modify a feature
- Ctrl+T: Move a shared Node
- Ctrl+V: Display the vertex positions window
- DEL: Delete the selected objects
- Ctrl+X: Activate the line cutter tool
- Ctrl+F: Merge the selected lines
- Ctrl+I: Create intersections
- Ctrl+Alt+F: Flip the selected line (change the orientation)
- Ctrl+G: Display the snapping panel
- ENTER OR TAB: Finish a segment or apply the modifications
- ESC: Cancel an edition or modification
Attribute tool
- Ctrl+A: Display the Object attribute window
- Ctrl+Alt+A: Display the Object attribute window (batch)
- Ctrl+Y: Set Orientation tool
Others
- Ctrl+L: Display the log window
- Ctrl+Alt+R: Run the selected query
- Ctrl+Alt+I: Display the information Window